Dynamic Promo Codes with Webhooks
Create unique, time-limited promo codes for each subscriber using workflow webhooks and custom fields.
This tutorial shows you how to generate unique, personalized promo codes for each subscriber in your email sequences. Instead of using a static code like LINKEDIN25 for everyone, you'll create individual codes with expiration dates to drive urgency and make subscribers feel special.
Why use dynamic promo codes?
- FOMO effect — Time-limited codes create urgency and encourage immediate action.
- Exclusivity — Unique codes make subscribers feel like they're getting special treatment.
- Tracking — Individual codes let you track which subscribers convert.
- Credibility — Personalized codes feel more authentic than generic discount codes.
How it works
- Subscriber joins your workflow (via tag trigger or form submission).
- Workflow webhook step sends subscriber data to your server.
- Your server generates a unique coupon code with expiration.
- Your server updates the subscriber's custom field with the coupon.
- Email steps in your workflow display the personalized code using variables.
Prerequisites
- A Lumail organization with an active workflow.
- One of the following to handle the webhook:
- No-code: Make.com, Zapier, or n8n scenario
- Low-code: Vercel, Cloudflare Workers, or Val.town function
- Custom: Your existing backend server
- Optional: A payment provider (Stripe, LemonSqueezy) for validated coupons — or just generate unique tracking codes.
Step 1 — Create a custom field for the coupon
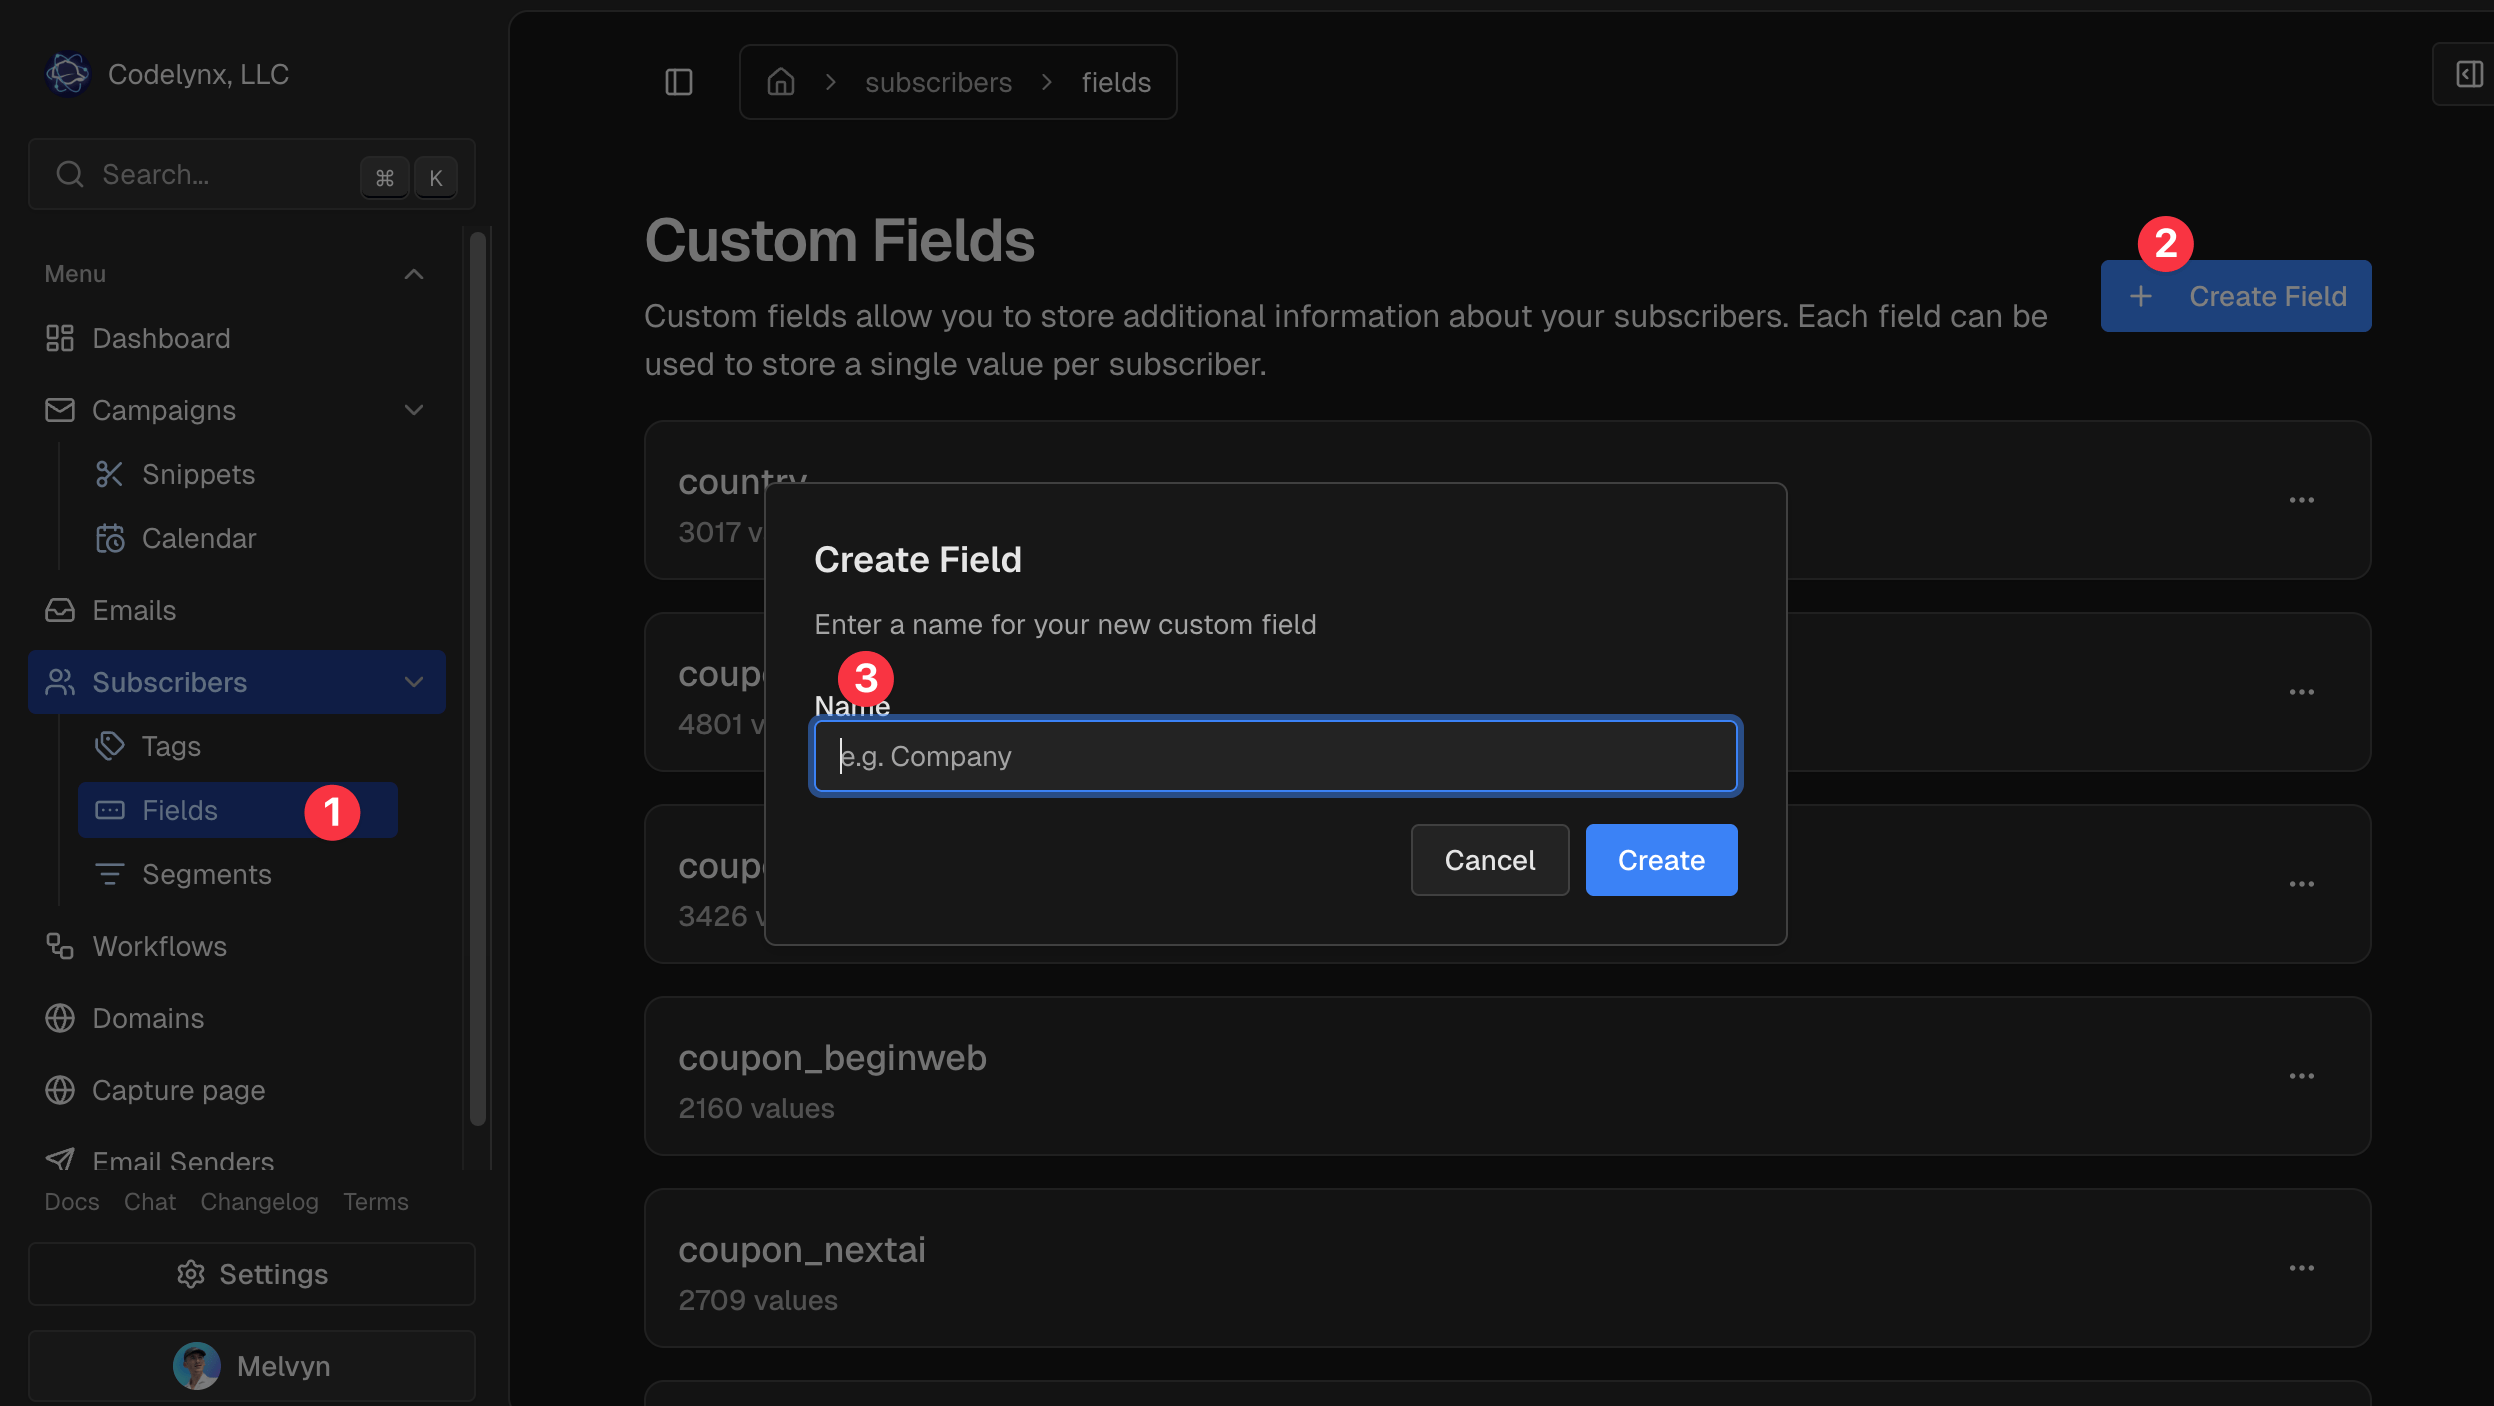
Before setting up the workflow, create a custom field to store the promo code:
- Go to your Lumail dashboard.
- Navigate to Settings → Custom Fields.
- Create a new field:
- Name:
promo-code(oratrakt-couponif using Atrakt) - Type: Text
- Name:
This field will store each subscriber's unique promo code.
Step 2 — Set up your workflow
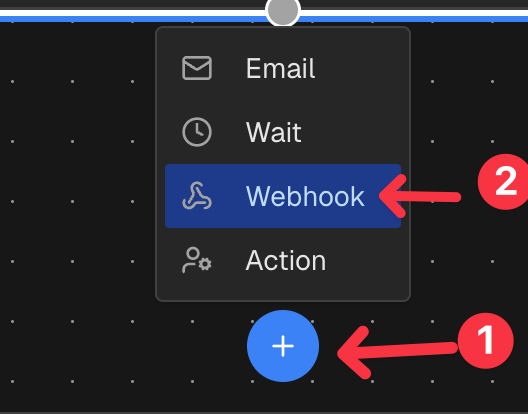
Create a workflow that triggers when subscribers join your sequence:
- Go to Workflows in your Lumail dashboard.
- Create a new workflow or edit an existing one.
- Add a Trigger (e.g., "Subscriber added with tag:
new-lead"). - Add a Webhook Step right after the trigger.
Configure the Webhook Step
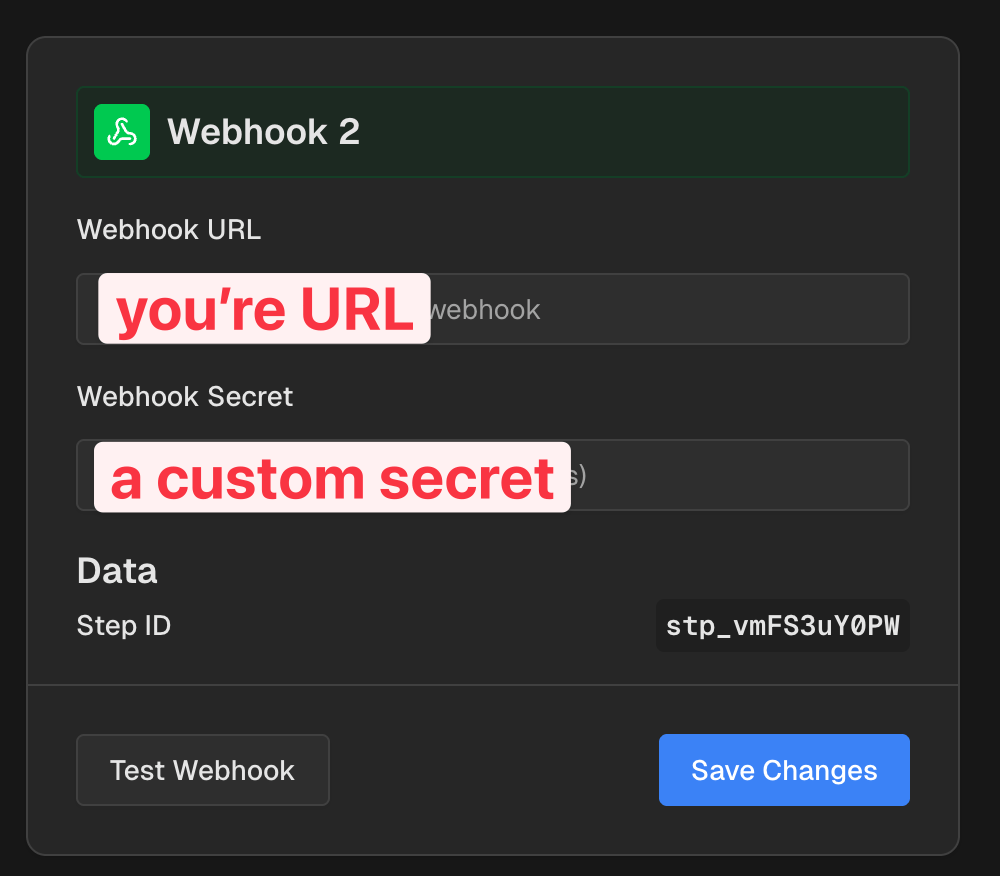
In the webhook step configuration:
- Webhook URL: Your server endpoint (e.g.,
https://your-app.com/api/generate-coupon) - Webhook Secret: A secret key for authentication (optional but recommended)
The webhook POSTs this body. payload stays nested. When a secret is set, it is also sent as the x-lumail-signature header.
{
  "subscriberId": "sub_123",
  "subscriberEmail": "[email protected]",
  "organizationId": "org_xyz",
  "workflowId": "wf_789",
  "stepId": "step_456",
  "secret": "your-secret",
  "payload": {}
}
Step 3 — Build the coupon generation endpoint
Create a serverless function or API route that:
- Receives the webhook payload from Lumail.
- Generates a unique coupon code with expiration.
- Creates the coupon in your payment provider (optional).
- Updates the subscriber in Lumail with the coupon code.
Example with Next.js and Stripe
Create app/api/generate-coupon/route.ts:
import { NextRequest, NextResponse } from "next/server";
import Stripe from "stripe";

const stripe = new Stripe(process.env.STRIPE_SECRET_KEY!);

export async function POST(request: NextRequest) {
  try {
    const body = await request.json();

    // Verify webhook secret
    if (body.secret !== process.env.LUMAIL_WEBHOOK_SECRET) {
      return NextResponse.json({ error: "Unauthorized" }, { status: 401 });
    }

    const { subscriberEmail, subscriberId } = body;

    // Generate unique code
    const uniqueCode = `WELCOME-${subscriberId.slice(-6).toUpperCase()}`;

    // Set expiration to 7 days from now
    const expiresAt = Math.floor(Date.now() / 1000) + 7 * 24 * 60 * 60;

    // Create coupon in Stripe
    await stripe.coupons.create({
      id: uniqueCode,
      percent_off: 25,
      duration: "once",
      redeem_by: expiresAt,
      max_redemptions: 1,
    });

    // Create promotion code for the coupon
    await stripe.promotionCodes.create({
      coupon: uniqueCode,
      code: uniqueCode,
      max_redemptions: 1,
      expires_at: expiresAt,
    });

    // Calculate expiration date for display
    const expirationDate = new Date(expiresAt * 1000).toLocaleDateString(
      "en-US",
      {
        month: "long",
        day: "numeric",
        year: "numeric",
      },
    );

    // Update subscriber in Lumail with the coupon
    await fetch(`https://lumail.io/api/v1/subscribers/${subscriberEmail}`, {
      method: "PATCH",
      headers: {
        "Content-Type": "application/json",
        Authorization: `Bearer ${process.env.LUMAIL_API_TOKEN}`,
      },
      body: JSON.stringify({
        fields: {
          "promo-code": uniqueCode,
          "promo-expires": expirationDate,
        },
        triggerWorkflows: false,
      }),
    });

    return NextResponse.json({ success: true, code: uniqueCode });
  } catch (error) {
    console.error("Coupon generation failed:", error);
    return NextResponse.json(
      { error: "Failed to generate coupon" },
      { status: 500 },
    );
  }
}
Step 4 — Use the promo code in your emails
After the webhook step completes, the subscriber has a promo-code custom field. Use it in your email content with Lumail variables:
In the editor, type @ to insert variables — your custom fields will appear in the list.
You can also add this promo code inside the URL, in the editor you can write https://example.com/?code={{promo-code}}.
Step 5 — Test the flow
- Deploy your webhook endpoint to a publicly accessible URL.
- Add the webhook URL to your Lumail workflow step.
- Trigger a test subscriber by adding the trigger tag to a test email.
- Check the subscriber in Lumail dashboard — verify the
promo-codefield is populated. - Review the email sent — confirm the code appears correctly.
Debugging tips
- Check your server logs for webhook receipt confirmation.
- Verify the Lumail API token has permission to update subscribers.
- Ensure the custom field name matches exactly (
promo-codeis case-sensitive). - Test with
triggerWorkflows: falseto avoid infinite loops.
Summary
By combining Lumail's webhook steps with your backend logic:
- Webhook step triggers your coupon generation endpoint.
- Your server creates unique codes and updates subscriber custom fields via the PATCH API.
- Email steps display personalized codes using
{{promo-code}}.
This creates a seamless experience where each subscriber receives a unique, time-limited promo code — driving urgency, tracking conversions, and making your offers feel exclusive.
Related Documentation
- Webhook Step Reference - Webhook configuration
- Update Subscriber API - Update subscribers with custom fields
- Variables in Emails - Use custom fields in email content
- API Tokens - Authenticate webhook callbacks
- Create API Token Tutorial - Generate tokens for webhooks
- Workflows Overview - Learn about workflow automation